June 16, 2018
Previously I explained that mapping learning experiences is different from mapping customer experiences. Now it’s time to look at how you can create a learner journey.
I will take you through the general steps you’d want to take when you’re mapping out a learner journey.
1. Choose the purpose of your map
First you need to know if the purpose of your learner journey is to analyse an existing learning experience or to design a new one.
Due to the innovative nature of my work as a learning experience designer, I mostly design new experiences. While this requires a bit of a different approach than analysing an existing situation you can follow the next steps in both cases. When you create a new experience though, you’ll probably be going back and forth between steps 3, 4 and 5 as you iterate your design.
2. Do your research
The creation of a learner journey always starts with doing research. Especially when you analyse an existing experience it’s all about researching the people that take part in this experience for what they do, what’s on their mind and what they learn. When you design a new experience it’s just as important to get to know the people and the learner in particular.
3. Create an outline
A learner journey is structured on a horizontal axis and a vertical axis. We’ll start with the horizontal axis which represents time.
Structuring your learner journey starts with mapping the different phases that take place. This offers a rough structure for you to work with. You can add details later on. Be aware of the fact that all phases need to be included, also the ones that are not specifically about learning activities. Let me give you an example:
Let’s say someone is looking to take an online course. The first phase will be orientation as this person first has to make a choice. The second phase would be starting the course, which could involve things like a financial transaction, registration, creation of a profile page. These are no deliberate learning activities but they are vital parts of the learning experience.
That said, most phases should have a learning outcome. This describes what the learner gains form each phase and how it is relevant and meaningful to them. In each phase there will be different activities. By doing these activities the learner should be able reach the learning objectives that are necessary to achieve the desired learning outcome. Once you can write down the different phases chronologically, you get an outline of the learner journey.
4. Pick the elements you need
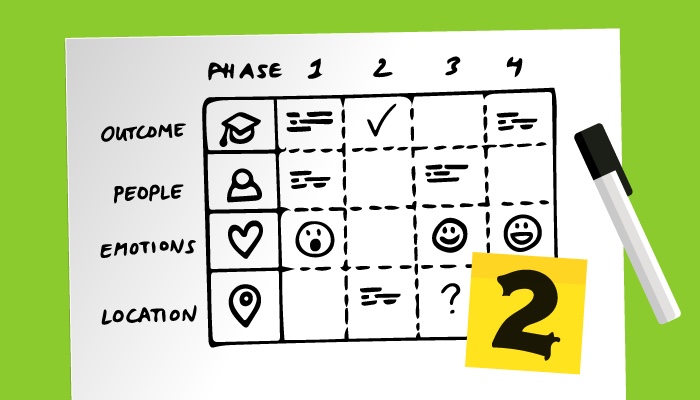
Now it’s time for the vertical axis. The vertical axis displays elements that play a part in the learning experience like the people that participate in the experience, the activities they do and the location where the learning takes place.
Some basic elements of a customer journey are channels, touch points and what your customer does, thinks, sees and feels. I like to use elements from the learning experience canvas like the learning outcome, learning objectives, people, location, resources and activities. You’re free to add any element you need to complete your map either from the learning experience canvas or from customer experience mapping.
One thing I urge you to include is the emotional state of the learner. What the learner feels is a vital part of the experience as it has a huge impact on how and what we experience.
You’ll want to list the different elements you choose in a way that is logical and practical. For instance, when you have different types of people, like a student, a teacher and an external expert participating in this experience, you want to keep them close to each other so you can easily oversee their interaction. Or if you use just one location most of the time, move it to the bottom as it doesn’t add much information to the journey.
5. Finalize your map
Once you’ve chosen all the elements you need and the different phases are clear, it’s time to map out the complete experience. With the horizontal and vertical axis in place you end up with a grid. Each spot in this grid tells you what happens at a specific moment in time.
As you start to fill up the grid, you’ll see the experience in more detail. This is when you’ll probably find out what may or may not work in this experience. Remember that all elements are interdependent. So you may find out that the location isn’t ideal for a certain activity. Or that the emotional state of the learner requires more time to create the right circumstances to learn.
That’s the key purpose of creating a learner journey: getting critical insights into the process the learner goes through and how all different elements impact this experience. And when you change one thing, other elements can also change because they are related.
You can make a learner journey as big or complex as you want or need to. As long as it serves the purpose of getting a clear overview of the actual experience as it takes place over time.