October 6, 2020 by Niels Floor |
Empathy is a vital skill for learning experience designers. It allows you to see the world through the eyes of the learner. I’d like to share a LX design tool that can improve your ability to empathise and the overall the quality of your designs: the empathy map for learners.
Empathy is a skill.
The ability to empathise is not a talent, it’s a skill. Empathy is a skill you can develop through practice. Every time I research learners I train empathising. Gaining a deep understanding of the people you design for is more than a necessity, it’s part of what makes my work so endlessly interesting and enjoyable. People in all their diversity and uniqueness are the heart of your design and your design process.
Empathy mapping as a method.
Research enables you to get to know with the learner. Through conversations, interviews, focus groups, co-creation and observation you get a peak into the life of the learner. Of course you want to capture the data you’ve gathered and the insights you’ve gained from your research in an effective way. With my background in interaction design I’ve used personas to create a profile of the learner. This is a great tool for gaining a general understanding of the learner and their needs. While I love using personas, they don’t allow me to really walk in the shoes of the learner. In other words to really empathise with them.
That’s where empathy mapping comes in. The empathy map was created by Dave Gray as part of a human-centered design toolkit. The purpose of an empathy map is to develop a deep, shared understanding and empathy for other people you design for. Over the years the empathy map has evolved and several adaptations have been made to serve specific purposes. For example to empathise with the user of an app, the customer of a supermarket or a patient in a hospital.
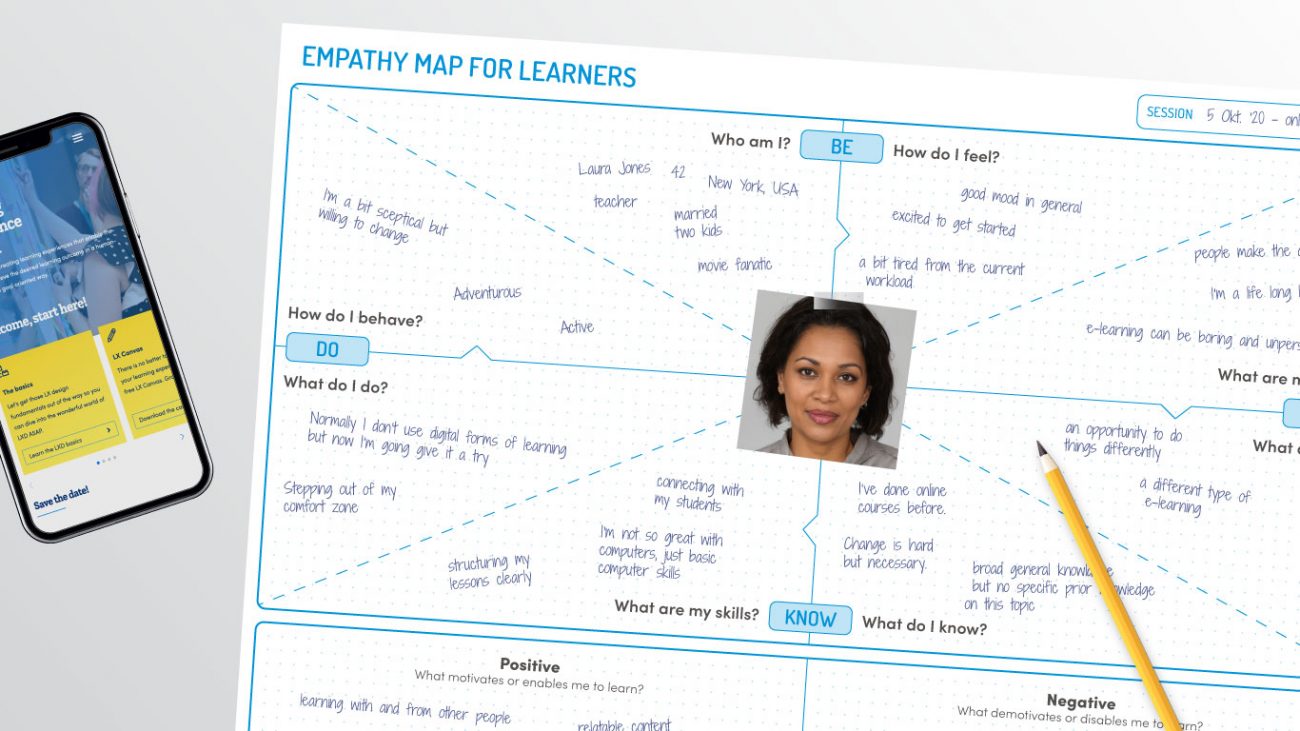
Empathy map for LXD = the empathy map for learners.
Mapping a learner also requires and adaptation of the empathy map. A couple of years ago I started working on an empathy map for learning experience design. After using it with several clients and a couple of iterations it’s time to share it with you: the Empathy Map for Learners.
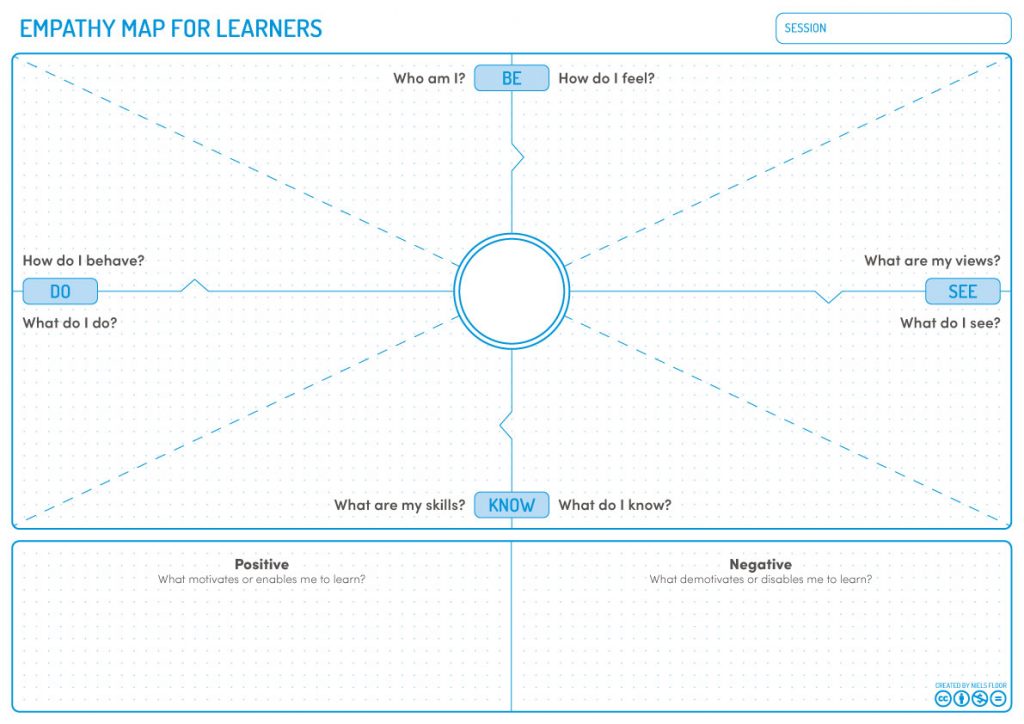
If you’re already familiar with the original empathy map it’s easy to spot the similarities. When you look a bit closer there are several obvious differences that make this empathy map more suitable for learners. First and foremost the four main quadrants are dived up into two triangular parts. Each triangle has a question to answer about the learner. When you answer all eight questions you’ll end up with a detailed view of who the learner is.
How to map empathy.
It’s obvious that you need to interact with the learner you’re mapping so let’s assume you’re actually talking to the learner right now. Also, you need to have a clear idea of the learning outcome that the learner would like and/or need to achieve. Example: the learner wants to learn how to deliver a great presentation for a large audience. The outcome would be about feeling confident, inspiring other people and being successful
- Write down the date and name of the session in the top right corner.
Example: 15-09-’20 presentation project - Start by asking the question “Who am I?” This is a relatively simple question with a factual answer.
Example: Jennifer Duncan, 35 years old, Boston, USA, Account manager at Cisco, mother of three children. - Now answer the rest of the questions in a clockwise order. It’s important to relate every question to the desired learning outcome.
Example: How do you feel about delivering presentations? The answer could be: “It stresses me out because I don’t feel confident talking in front of large groups.” - After answering these questions formulate the positive and negative aspects that would (de)motivate or dis- or enable the learner to be successful. Most answers can be found in the previously answered questions. Others could arise from specifically asking about the positives and negatives to the learner.
Example: Negative – Fear of public speaking (based on the “How do I feel” question) – Positive – I’d like to be more confident in general. - Finally add a picture of the learner in the center of the empathy map. This completes the empathy map and makes it much easier to remember the learner and empathise with them.
Following these steps should get you on the right track. There are a couple of things that are vital to keep in mind though:
- An empathy map is just a tool, how you use it determines the quality of the insights you gain and the extent to which you’re able to empathise. It takes time and effort to use them.
- You can create empathy maps in different phases of the design process, not just at the start as part of your research. For example, you can also use it to let the learner reflect on the actual learning experience.
- People change and so will your empathy map. The answers on the empathy map depend on the moment you use it. Don’t be afraid to update an empathy map once in a while.
That’s the empathy map in a nutshell. Now it’s up to you! Feel free to download the empathy map and let me know what you think, I’d love to hear from you.
Tip: Looking for another helpful LXD tool? Download the Learning Experience Canvas for free to help design more powerful learning experiences.